Contouring is a very important part of make-up application. If you are new to the make-up scene and are unsure of what contouring is, keep reading because I’ll tell you exactly what it is and how to achieve the look.
I think it’s best to know your face shape so to determine that, please check out last weeks blog by clicking here.
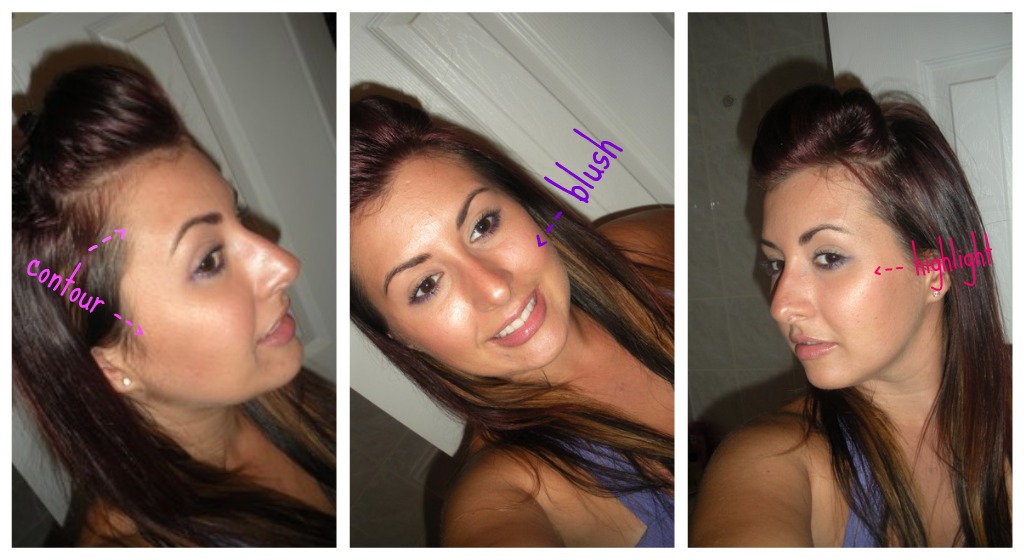
Contouring is used to slenderize the face and add definition to certain features like eyes or jawline. If your face is already slender, you can skip this technique because we don’t want to make your face look chiseled or hollow.
Contouring is achieved by using a cream or powder that is 2-3 shades darker than your natural skin tone. Apply your contour with a gentle hand, we don’t want your face to look dirty.
This is going to take practice so keep at it!! After all, practice makes perfect ;)
NOTE: If you are applying a cream contour, apply this after your foundation and before your set powder. Powder contours can be applied as an after-thought!
CONTOURING YOUR CHEEK BONES
The most popular type of contour is for your cheek bones. This well help make them more prominent if your face is round, for example.
You will need an angled brush, which looks like this one from Sephora or this one from MAC.
Next, you’ll want to choose a matte bronzer or matte contour shade. Shimmer is a big no-no in the contouring department. A contour shade or bronzer should be 2 or 3 shades darker than your skin tone, so choose carefully.
The technique to contour your cheeks is simple but this isn’t the 80’s so you don’t need to over do it!!
Here’s what to do:
- Smile- your contour should begin by the ear and stop before you reach the apple of your cheeks. Those are your cheekbones;
- lightly pick up some of your contour shade or bronzer and sweep it under your cheek bones. Do not apply it way down by your mouth. Your cheek bones are higher up by the ears.
- Your contour should be at the sides of your face, not the front. If you can see your contour when looking directly at the front of your face, you’ve gone too far down.
- Don’t pick up too much color at once, apply it in layers in order to build up the color.
- After you’ve contoured the cheeks, apply blush to the apples of your cheeks and you’re done.
SLENDERIZING YOUR FACE
To thin out your face, apply the contour shade or bronzer to the outer edges of your face with an angled brush (ie. similar to the ones linked above).
To downplay a prominent forehead, shade in around the edge of the top of your hairline and on the sides of the hairline by the temples.
To make a jawline less prominent, countour slightly under the jawline and up by the lobes of your ear
To slenderize a wide nose, apply two thin lines of contour on either side of the bridge of your nose.
OTHER TYPES OF CONTOUR
To add prominence to your nostrils, use a thin brush to shade under your nostrils and up and around the natural curve of your nostrils.
To emphasis your cupids bow, use a thin brush to lightly apply your contour shade or bronzer to that little dip above your upper lip.
To make your top lip appear fuller, use a white liner to outline the outer edge of your cupid bow and just blend it out with a finger so the line isn’t so harsh.
To add emphasis to your cleavage, with a medium to large dome brush, start at your sternum and blend the color up and around each breast to forn a ‘Y’ shape. Make sure to blend, blend, blend!! You don’t want harsh looking line.

this contour is veryyyy exaggerated just to give you an idea!

this is how a properply contoured face should look like... very subtle